Tuesday, November 3, 2009

User Setup Form in Dynamics

Introduction: Dynamics has a feature of setting up the view of forms as per the user’s requirements. This setup is specific for user and company that is every user can customize his/her forms view for his/her user account and company only.

How to hide the fields in any form

  • Open the form on which you want to hide the fields.
  • Right click on the particular field which you want to hide and select the hide option.
  • This will hide the particular field.

How to show the hidden fields in any form

  • Open the form on which you want to show the hidden fields.
  • Right click anywhere in the form and select the show option
  • The show option will display the hidden fields, just select the field which you want to unhide and then the field will appear again on the form.

How to open user setup forms

  • Open the form on which you want to change the view setup.
  • Right click on any control of the form on which you want to change the view and find the setup option, for Example if you want to change the view of grid then right click on the grid control of the form and find the setup option
  • Click on the setup option to open User setup form.

How to Move fields in user setup forms

  • As you can see in below image the user setup form is showing the layout of the fields in layout tab on which all the controls and fields are appearing and we can see what we want to change in the layout view.
  • In layout tab there is one section as “Move” and on this you can see different option as Up, down, left and right to move the fields as we want.
  • Up and down option move the fields in the same control for example in below image you can see fields in the grid and if you want to move “Invoice account” field above the “Customer group” field then you can use Up option for this.
  • You can also use left and right button to move the fields in between the controls of the forms like by using these option you can move the particular filed from grid control to Group control or you can also move the fields in other tab also.

How to add fields in user setup forms

  • In user setup form > Layout tab > Click Add fields button to open the list of tables and then user can select the particular field by expanding the table and selecting the particular field like in below screen the “Main contact” field from Customer table is selected
  • The user then has to click on add button and the selected field will appear in grid control of Customer form.
  • The selected field will appear in the grid as “Main contact” and if you want to change the label then you can change the label by entering the label name in the label property of filed appearing in the right side of user setup form.


How to remove added fields in user setup forms

  • In user setup form > Layout tab > find Remove option
  • The remove button will be disable all the time, it will be enable only when any user added filed is selected and by clicking this button user can remove his/her added fields.
  • For example in previous screen we have added “Main contact” field and if user wants to remove this filed then user has to select this filed and click Remove button to remove this field from Project form.

Summery: In this way user can easily customized the form view and can add or remove fields for their own view.

Thanks.


Tuesday, September 29, 2009

Create customization project by Compare layers in dynamics ax

Compare layer functionality is used to create a project of your customized nodes on the basis of layers.

Whenever you do customization you can see your customize nodes in AOT but what if you need to export your customization then you have to search all your customization from AOT and create a separate project, it will be very complicated and time consuming task.

To save your time and effort you can use Compare layer, it creates a project of all the customization you have done.

Let see how you can do that
Go to Menu > Tools > Development tools > Code upgrade > Compare layers and you will see a form for compare layer.


  • In this form enter the project name for your project let’s say Test _Proj.
  • In Source layer enter the layer in which you done the customization let’s say usr layer.
  • In Reference layer enter the layer from which you want to compare the customization let’s say sys layer.
  • The last option “Only include element present in both the layers” is for creating the project which will include the elements present in both layers and it will not take any new customized element so for now we will not check this box.

This will create Project “Test_proj” in Private folder of projects window.


You can double click Test_proj to see the all the customized elements node wise and if you want to share this project to other developer then just drag this project and drop it to shared folder in project window.
You can open project window from toolbar or you can Press Ctrl + shift + P to open it.

Thanks.

Thursday, September 24, 2009

Penny difference in Dynamics ax

Introduction: In day to day business activities we need to adjust the invoice amount while receiving the amount from customer and it can be due to many reasons, so for these types of small adjustment dynamics provide penny difference functionality.

Let’s see what we have to do enable this functionality.

Step 1

If we want dynamics to do the adjustment in amount when we do settlement of invoice in A/c receivable then we have to go to
A/c receivable > Setup > Parameters form > Settlement tab > Settlement section.
Here you can see two fields as

“Maximum penny difference” and “Maximum overpayment or underpayment”

Maximum penny difference: In this field you have to put the amount difference which you want to adjust while doing the settlement of customer for example if put $5 in this field and if invoice amount and settlement amount has a difference equal to or less then $5 then penny difference functionality will work.

Maximum overpayment or underpayment: This field fills automatically when you fill the above field and this field show the amount that you can adjust either more from invoice amount or less, for example the received amount can be more or less from the invoice amount when we do enter the payment for particular invoice against the customer.

Step 2

Now you have to define the ledger account for penny difference and for that you have to go to General ledger > Setup > Posting > System account form.

In this form create a new record and in posting type field select “Penny difference in default currency” from the lookup then selects the ledger account in ledger account field and then enter the name.
Do the same thing to create a new record for “Penny difference in secondary currency”.

Theses two steps will enable the functionality for penny difference, now let’s see one example for this.

Suppose we have an invoice of amount $1000 against the XYZ customer
We have setup the Maximum penny difference as $3 and have taken the ABC ledger account for both the penny differences account in system account form.

Now if we received $999 for the invoice of $1000 and when we do this entry in dynamics ax then the $1 is automatically adjust to ledger account ABC and when you see the balance by currency of ABC ledger account, it shows $1

Note: If you setup this functionality and still it’s not working then you have to check that your exchange rate is setup right in General ledger > setup.

Summery: This article explains that how easily you can setup penny difference functionality and adjust the amounts in a different ledger account.

Thanks.

Thursday, September 17, 2009

How to call a method from a caller form

Introduction: Lots of time we need a method from calling object to be run when the code is running from called object for example if we have a class called by a form object and we need some values in class from a caller form object then we can get those values by calling a method from a caller from in a class.

Let’s see a real life example in dynamics which shows how we can do this.
  • Open “ProjInvoiceProposal” form in AOT and then you will see a button as “Create invoice” in the right side.
  • Actually this MenuItemButton is calling “ProjInvoiceChoose” class.
  • Let’s go to class node and search “ProjInvoiceChoose” class, once you get the class just right click and select edit option this will open all its methods.
  • Go to “Main” method of the class and you will see some code similar to given below.
if (args && args.caller())
{
projInvoiceProjId = args.caller().projInvoiceProjId();
projId = args.caller().projId();
}
if (args.caller() && args.caller().callerDataRecord())
{
argsTrans.record(args.caller().callerDataRecord());
transIdList = ProjInvoiceChoose::createTransIdList(argsTrans);
}
  • Here you can see the statement like “args.caller().projInvoiceProjId();” In this args.caller() refer to the calling object that is “ProjInvoiceProposal” form in this case and "projInvoiceProjId()" is a method which is created in caller form and called in “ProjInvoiceChoose” class.
  • Similarly two more methods called by args.caller() that is “projId()” and “callerDataRecord()”.
Note: You can check the “ProjInvoiceProposal” form and in the method node of the form you will find these methods.

Summery: So this is how we can easily call methods from calling object and use it as per our requirement.

Thursday, September 3, 2009

Dynamics ax Report Wizard

Introduction: Dynamics ax allows several ways which we can refer for reporting like Adhoc reporting, OLAP reporting, VS reporting tool, MS Frx 6.7, Dynamics ax reporting, Report Wizard in dynamics ax etc.
In this article we are going to concentrate in Report Wizard in dynamics ax and we will see how user can create efficient reports with some cool features.

For this article we will create report which will display customer transactions by a customer.

Step 1: Running the Report Wizard

Let’s run the Report Wizard form
Ms dynamics Menu > Tools > Development tool > Wizards > Report Wizard
You will see a screen like this


You can see a check box in this screen, if we will check this box then while creation of reports the wizard will show the system names for tables and fields but for user the table caption will make more sense then the table name so here do not check this box and click on next button.

Step 2: Defining the Report system name and caption

In the next screen enter the system name in the name text box and enter the caption in caption text box for the report.


Here enter “Demo_CustTransactions” as a system name and “Customer transactions” as a caption for the report.

Check the “Auto create label” option and choose the file Id, this will create the labels for the report from the selected label file id.

Click on next button to continue.

Step 3: Defining the tables for Report

In the next screen you will see interface where we can select the tables for report.


You can see two sections now in the wizard, in the left section there are two windows, upper window shows list of all the tables and the bottom window shows the list of related tables.

When this screen appear first, the bottom window and the right section remains blank, when we select and move any tables from upper window to the right section window then the bottom window in the left section shows the list of tables related to the selected table in the right section.

Here please select and move Customer table from upper window and its related table Customer transactions from bottom window to right section.

You can move the tables by clicking the button given in between the two sections and you if you moved multiple main tables to right section you can use Up and down button in the right section to arrange the tables in order.

Now this step of the wizard initialized the tables for the report.

Click next button to continue.

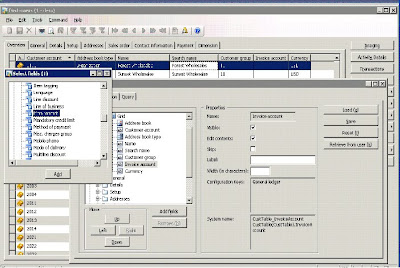
Step 4: Adding/Removing fields required for report

In the next screen again two sections appears

  • Left sections show fields, field groups and methods for Customer and Customer transactions tables.
  • In right section by default AutoReport group fields are displayed with Customer and Customer transactions tables and these fields will appear in report.
We can add fields from the left section or remove from the right section in this wizard.


For this report remove the AutoReport group of the customer table from the right section and add two fields “Customer account” and “Name” from Customer table node of left section.

Keep the AutoReport group for Customer transaction table as it is and check that AutoReport group has two amount fields “Amount Currency” and “Amount settled”. We will use these fields in our next step of wizard.

You can use Up and down button in the right section to arrange the order of fields but both the button will be disabled in case of AutoReport or any other field group.

Click next button to continue.

Step 5: Set the fields to be calculated in the report

In next screen the right section of the wizard is displaying the fields to be calculated.

The wizard automatically takes the amount fields for calculation.
In this case wizard has taken “Amount currency and “Amount settled” fields. I mentioned about these fields in previous step.


We have three check boxes as well with both the fields, Sum total, Sum positive and Sum negative.

If we don’t want Sum of these fields then we can remove both of them or one of them as per the report needs.

In our case go with both the fields and click in next button to continue.

Step 6: Set the fields for sorting in the report

In next screen of the wizard we will set the fields upon which the sorting will be based.


Like the previous steps we can add the fields from the left section to right section for sorting.

In our case we are going with sorting on customer account field and also setting the order as ascending.

Click next button to continue.

Step 7: Allow the grouping in the report

In the next screen the left section gives an option if we want to make grouping by customer account field, as we had selected “Customer account” and “name” fields from customer table for report the wizard automatically takes the key field for groping.


In the right section the wizard shows the effect of what happen if you select the Customer account field check box in the left section.

So here leave the Customer account field as checked and click next button to continue.

Step 8: Allow the Group totals in the report

The next screen you can see is similar to the previous one, Here in this report if you want the group totals to appear you have to check the Customer account field because the grouping is based on customer account.


So do the same and click next button to continue.

Step 9: Define the ranges to filter the data return by the report

The next screen allows you to define the range which we will use to filter the data return by the report.

Bydefault the wizard gives you the fields to set the range in the right section and if you want to add more range then you can add more fields from the left section.


For our report go with these fields and click next to continue.

Step 10: Set the layout and report template for the report

In next screen you can set the layout and template for the report.


Select the “Tabular” option from layout section and select “Auto” option from the orientation section.

Select the “frontPage” template for the report from Report template section and click next to continue.

Step 11: Insert the report to menu and finish the wizard

In next screen you can see two buttons as “Design” and “Print preview”.


Design button : By clicking this button you can see or edit the design of the report.


Print preview button : By clicking this button you can see the preview of data returned by the created report.

There are one more section in this screen as “Add the report to a menu?” that means you want to insert this report in existing menu or not.

Select the second option that says “Yes,the report is to be opened from an existing menu” and click next button to continue.

In the next screen you are allowed to insert this report to the main menu.


Select Customer transactions report from the left section and drag it to Main menu > Cust > Reports menu in the right section.

Click next button to take you to the end screen and click finish button in the end screen to complete this wizard.

Step 12: Run the report from Main menu

Now run your report from Accounts recivable > Reports > Customer transactions.


Note :
If you are devoloper you can see this report in the AOT in report node and can change it as per user needs.


Summery : Reporting is one of the major part if we are using dynamics ax and if we have some knwoledge of dynamics ax database then by report wizard we can create very useful reports with options of grouping, sorting and filtering as well as very easy interface to deal with when working with wizard.

Happy reporting with Report Wizard

Thanks.